Fundamentals
"The most fundamental skill, is probably to just have fun" Aidan Brackenbury England Team rider
Much of the site so far has concentrated on an individual element of your surfing. Things like the bottom and top turns are easiest learned in isolation, as this allows you time to concentrate on one thing at a time.
The difficulty in taking these manoeuvres in isolation though, is that's not how we surf. One move leads to the next, and so on.
This page sets out to look at some core skills you need to practice that will really help to join up your riding into a polished performance.
If you are struggling with any of the skills on the site, it's always worth coming back here to check your fundamental skills are all they should be!
The Low Brace Rudder
This is the rudder we use the most during our surfing. Its position varies dependant on the type of move you are performing, but general rules are:
-
Placement of the blade is around the hips.
-
The arms should be in a powerful, flexed position. (Imagine you have a large beach ball between you and the paddle and you need to hold it there).
-
Its power is determined by how far in (less power) or how far out (more power) from the boat it is.
- You can graduate this power by starting with the blade close to the boat then pushing it away. This can be seen in the slashed top turn.
The picture above shows a perfect body position for the Low Brace Rudder. Arms flexed, blade in line with the hips.
Blade close to the boat, giving the rudder less power. This is perfect if you are only looking to engage a small directional change, as above where the rider is trying to race quickly down the line.
Blade further away from the boat. Here you can see the rider initiating a cutback, the spray everywhere is telling of a very powerful stroke used to rapidly change direction.
Here you can see the application of graduated power.
The blade starts close to the boat, and is pushed away to apply more power.
This allows for an unwinding of the body and gives a powerful turn.
You can see how the paddle has remained in the same place in the water, but the body and boat have moved around it.
The low brace rudder is used in almost every manoeuvre in some form or another. Here you can see it being used to engage a Barrel Roll.
Note in all the pictures, the body is turned so that the leading hand reaches over the far side of the boat.
The Beginning, Middle and End
Break up the way you think about your waves into three sections.
The Beginning
This will encompass your take off. It should be efficient, well timed, well placed in terms of your relativity to the shoulder, and almost more importantly it should be purposeful. As your skill develops you should find yourself missing less waves. Try to aim for a 100% catch rate - that is that every wave you've decided to catch, you do!
The Middle
This is where you throw everything you've got at the wave. It will encompass top and bottom turns, cutbacks, floaters, aerials, and anything else you can do. Realistically you won't do everything you can do on one wave, but try to see this middle section as one where the boat is in a constant state of movement, linking one move to the next, to make your ride as impressive as you possibly can.
The End
The end of the ride should be dictated by you! Don't allow yourself to just fall off the back of the wave. If you think this is going to happen, paddle hard to get back into it again and then pull off on your terms. Count your waves whilst you surf and work out how many you've actually ended on your terms, then work to develop this figure so most waves are ended by you, rather than the wave! Opposite, Darren Bason airs an exit.
Rail to Rail Transitions
This is what the "middle" bit of your wave is all about. Rail to rail transitions are one of the absolute fundamentals of performance surf kayaking. The ability to transfer from rail to rail on demand is how we link bottom to top turns, perform cutbacks, and even aerials are just very late rail to rail transfers.
An accurate rail to rail transfer can be as simple as shifting your weight from one side to the other, to slightly more complex combinations of rudders and weight shifts.
Think about the beach that you surf the most - try to imagine there is a clock face superimposed over the top of it like in the picture opposite. 12 o'clock points straight at the beach, 6 o'clock straight out back.
Exercise One
Catch a wave pointing at 12 o'clock. Once the boat is moving, turn it so the nose is pointing at 1, as it arrives at 1 turn it to 11, then keep transitioning between 11 and 1 and surf all the way in until you want to stop. If you were being viewed from above you'd be making a shallow S-shape on your way into the beach. This exercise will make you turn from rail to rail using a combination of:
- Looking - always initiate the turn by looking where you want to go.
- Rudder - place the blade in a low brace rudder position; graduate the pressure as required by your boat.
- Rail - the boat should be edged or leant over so the rail on the inside of the turn is engaged.
Common problems
Boat turning broadside to the wave
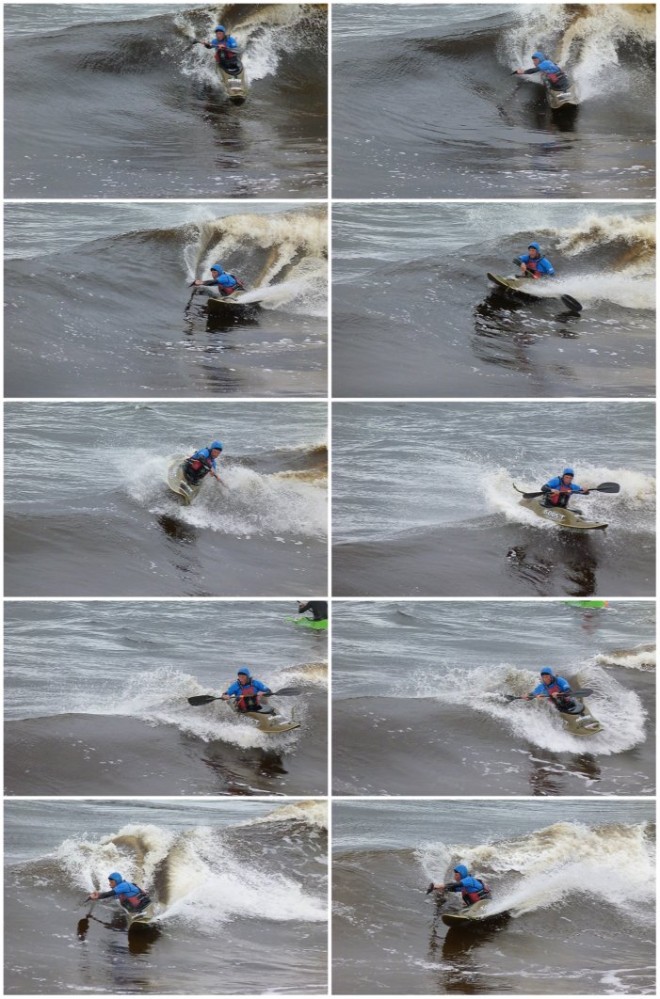
This happens when you allow the rail of the boat to remain engaged. The boat will only do what you tell it to, so if you are telling it to turn, it will! You can remedy this problem by neutralising the boat when you are pointing in the direction you want to go, in this case 1 or 11. Look at picture 7 in the sequence below, for an example of a neutral boat.
Boat stiff to turn
This is common if you try and turn the boat out of sequence. The body and the paddles should be initiating the turn and the boat should follow. Remember the order of Look - Rudder - Rail.
Timing
Good surf kayakers are always at least one move ahead. As the boat is going through 12 you should already be turning your head to initiate the turn back to where you've come from. For the first few times you do this exercise, imagine you have a metronome ticking in your head. Left, right, left, right, left, right - smooth controlled turns initiated by you! As you become more comfortable and proficient at it, hold the boat for a count of three when you are pointing at 11 or 1.
Exercise Two
This is the same as exercise one, however this time you are going to vary the boat between 10 o'clock and 2 o'clock. All the same principles apply. The photo sequence below shows a paddler moving their boat between 10 and 2 o'clock.
Too easy? Try 3 and 9, or if you are feeling particularly athletic 4 and 8 o'clock!

Exercise Three
This time, catch a wave and turn your boat so that it is pointing at 10 or 2 o'clock depending on whether the wave's breaking left or right.
On a right hander, once you are comfortably surfing at 2 o'clock, turn the boat to 3 then instantly back down to 1, and keep repeating. You should find that the boat is now surfing up and down the wave face! Remember to maintain the sequence of Look - Rudder - Rail.
Below is a sequence of a paddler surfing between 1 and 3 o'clock. You can see how he is surfing up and down the wave face in a combination of bottom and top turns. If you managed to complete exercise one, you should be able to do this!

Trim
We've mentioned a lot about the body in terms of it leaning the boat over from rail to rail. However the body also serves as a brake and accelerator through how we trim the boat.
Trim refers to leaning forwards or backwards in the boat, by leaning forwards you increase the waterline length of the boat and will therefore increase the speed at which it travels. By leaning back you force the tail of the boat into the wave creating drag which will slow the boat down.
The two pictures below clearly show a paddler aggressively trimmed forwards trying to generate speed, and another trying to put the brakes on!
The application of trim
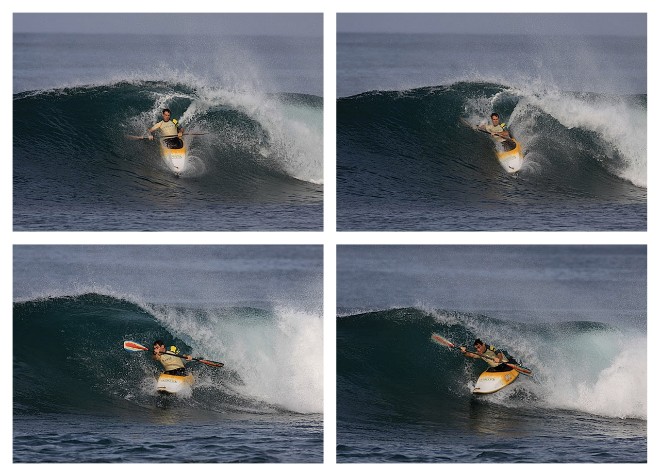
Your trim should constantly be changing as you adapt your speed and position in the boat to suit the waves that you're surfing. Some manoeuveres in the surf rely almost solely on trim. The sequence below shows Alejo Pacheco, one of the world's finest kayak surfers, using trim to get barrelled.

Lines
Surf kayaking can be seen as drawing lines on a wave. In fact the more 'scribbled' your line generally the more impressive your wave has been. As we learn, our lines go from being straight, to S shapes, and eventually to varying patterns all over the wave face - a mix of tight slashes and arcing curves.
To make our lines most impressive we need to use the whole of the wave face. Look at the diagram below, the wave has been split into top, middle, and bottom. Look back at all the pictures on this site and decide whether the surfer is in the top, middle or bottom of the wave.
Now get someone to watch your riding, or alternatively get some video or pictures of yourself riding, and decide where you are riding most. If you are only riding in one or two sections you need to think about how to adapt your riding so that you visit the other sections. Exercise three in the rail to rail transfers guide above will help you surf through all three sections.
When it all goes wrong!
Sometimes the beginning, middle and end all seem to happen at the same time. North Devon surfer, and surf kayak coach Chris Cutts-Hammond goes over the falls. Pictures by John Watson
This page has been possible through the sales of the 2011 Calendar
Thank you to everyone who's bought one or donated!
Pictures on this page by:
Pete Copp
John Watson
Mick Feeney
Stonefishfoto


